Three types of tie-in with or without chest coils.
1. With blocked chest coils
For even terrain requiring little variation in spacing of the team members.
Advantages:
- Coils are stabilized, comfortable.
- Tie-in at end of rope.
Disadvantages:
- Rope adjustments difficult.
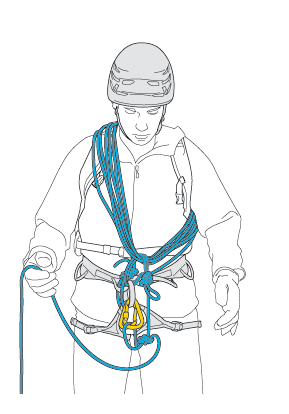
Tie-in on carabiner with figure-eight knot
Advantages:
- Reliable over time if knot is properly tied.
Disadvantages:
- Long to untie if knot is tightened by a fall.
- Use a directional carabiner or two reversed locking carabiners.
2. With unblocked chest coils
For terrain requiring frequent adaptation in spacing of the team members.
Advantages:
- Quick rope adjustments.
- Tie-in at end of rope.
Disadvantages:
- The coils can become undone.
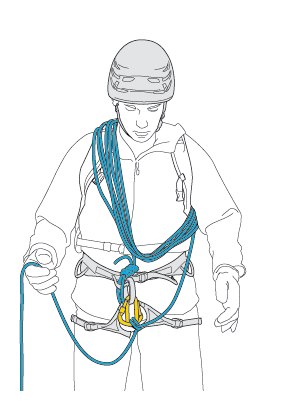
Tie-in on carabiner with a clove hitch
Advantages:
- Quick adjustments.
- Knot is easy to untie even when tightened by a fall.
Disadvantages:
- Use a directional carabiner or two reversed locking carabiners.
3. Reserve rope in bag, no chest coils
Set configuration for long walks.
Advantages:
- Comfortable to carry.
Disadvantages:
- Tie-in at end of rope is redone in case of emergency.

Tie-in to harness with a bowline knot
Advantages:
- Stays in place.
- Unties well, even when well-tightened.
Disadvantages:
- The loop must be secured with a carabiner.
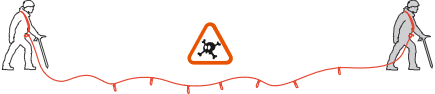
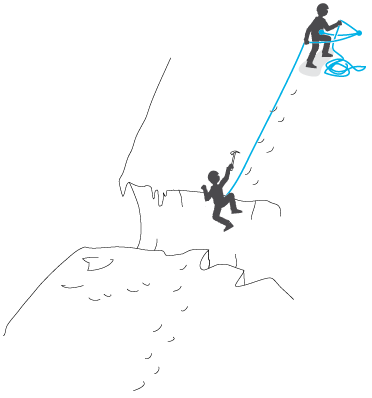
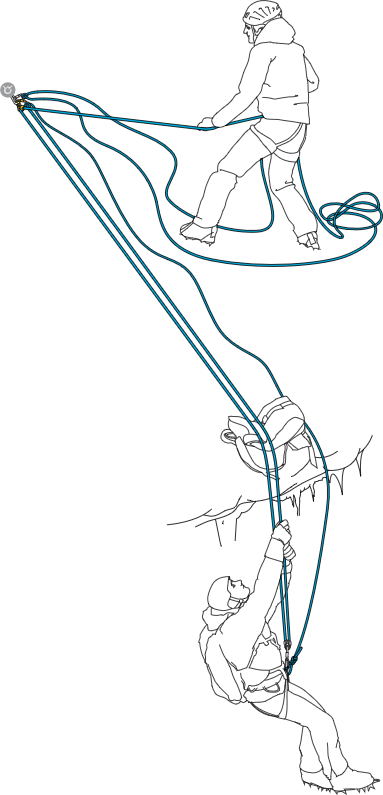
Approaching a glacier as a roped team of two
A crevasse fall is one of the major risks when approaching a glacier. Carrying hauling equipment and knowing hauling techniques is an essential precaution. But in the case of a crevasse fall, you must first stop your partner’s fall without falling in yourself. With a team of two, one climber alone will have to be the counterweight. It is thus important to start with the odds on your side…
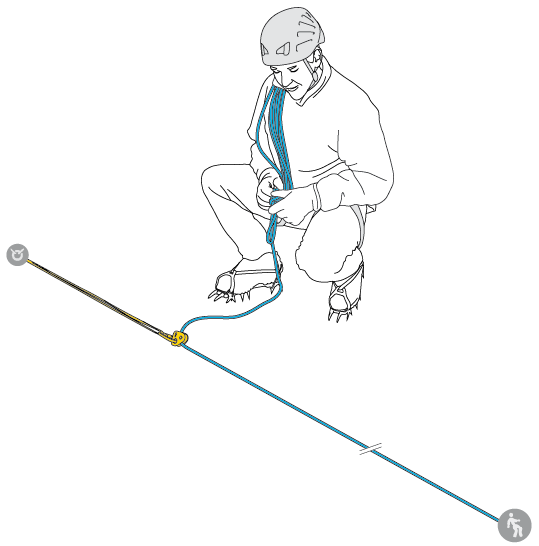
Tie-in distance
The two climbers tie in at each end of the rope.
The tie-in distance is then adjusted with their tied off chest coils.
In case of a fall, the belayer often needs to move forward to withstand the first impact, then again to slow movement and completely arrest the fall. The length of the rope between the belayer and the crevasse allows this displacement.
The tie-in distance not only allows having just one team member exposed to the crevasse, but also to have enough space for a fall-arrest maneuver.
Each team member must keep enough rope for setting up a hauling system.

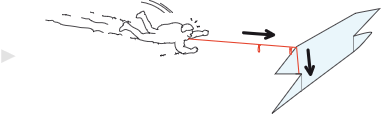
Knots to facilitate braking
The rope cutting through the lip of the crevasse is a significant factor in braking a fall.
Arresting a fall on a bare ice lip is very difficult.
On a snow lip, the presence of knots in the rope is a valuable braking aid.

Tie knots every 2 m along the rope (figure eight, overhand, butterfly…).

Note: the knots in the rope make the hauling system more complicated to set up after a crevasse fall.
Two options:
• Solution 1: set up a hauling system on a knotted rope (see Crevasse falls: hauling on a knotted rope).
• Solution 2: you have enough extra rope to set up a hauling system without knots on the free end of the rope sent down to the victim (for example, you can have this amount of extra rope by having joined two 50-60 m ropes).
Keep the rope taut
The team members synchronize their progression in order to keep the rope taut without holding looped rope in their hands. If the rope is slack, the victim will fall faster, his partner will not be able to stop the fall, and risks being pulled into the crevasse himself.


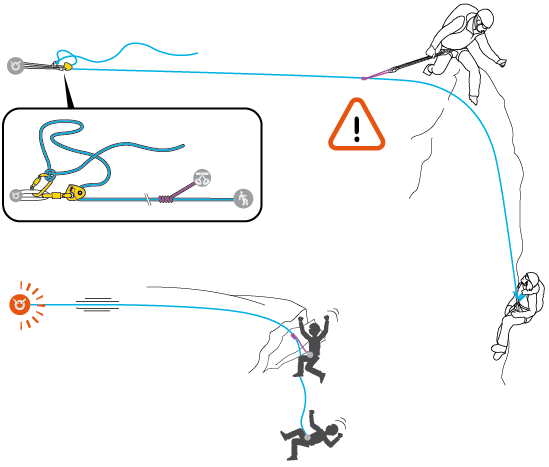
Crossing a bergschrund on a snow slope
While traveling an easy section, an occasional technically difficult part, like crossing a bergschrund, is often complicated to protect.
The specifics of the area may offer several options:
– crossing and taking the risk of no protection
– crossing with partial protection when possible
– turning back or finding another way
The leader takes the most risk, as generally there is no chance of placing intermediate protection.
Belaying the leader
If the greatest risk is falling into the bergschrund, the counter-weight of the second, farther back, may be enough.
If the risk is falling down the slope, a belay point must protect the party.
The second stays back, away from the line of a fall.
The leader’s rope does not go through the belay point, as it would be torn out in case of a fall.
The second effects a dynamic belay while anchored into the deadman.

Warning: the leader will fall below his belayer without a directional anchor. VERSO and REVERSO cannot be used in this case. The second can belay from his harness with a Munter hitch or using a body belay.
Belaying the second
The leader can reach an existing anchor point or create a temporary one in the slope.
The second is belayed with a Munter hitch or a REVERSO on the anchor.
Caution: belaying from the harness with a directional point on the anchor doubles the load on the deadman because of the pulley effect.
Examples of temporary anchors
Ice axe used as a deadman

Sling around a rock horn

Two triangulated ice screws

Caution: when planted vertically, the ice axe may help support one person, but is not a belay point and carries a high risk of coming out.

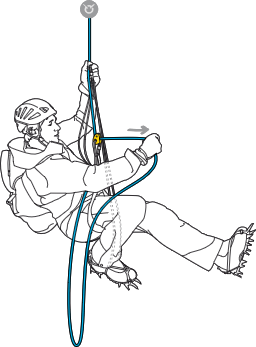
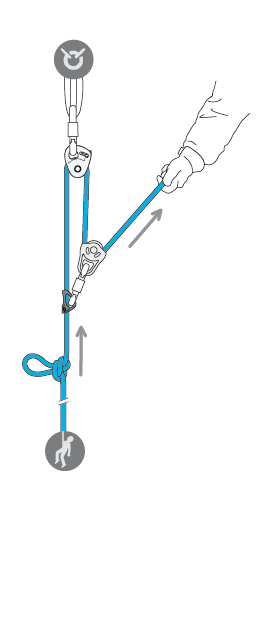
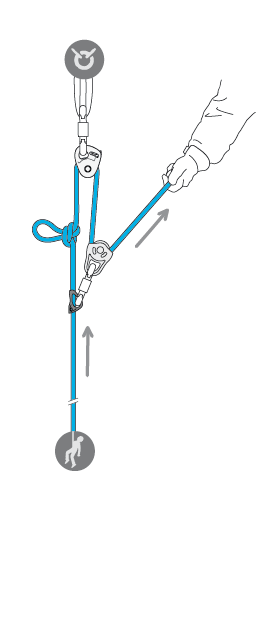
Rescue
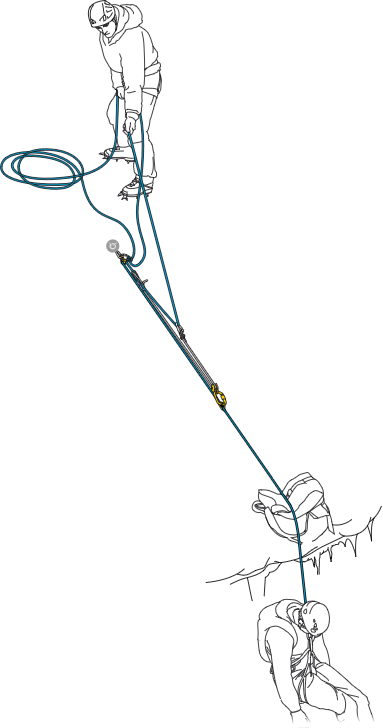
Crevasse rescue no. 1: transferring the victim’s weight to an anchor
Once the fall has been arrested, the person on the surface holds the victim by acting as a counterweight. Rapidly creating an anchor allows unloading of the victim’s weight to organize the rescue.
1. Creating a reliable anchor: ice axe or ski buried in the snow, or an ice screw in the ice. Connecting a sling to the anchor while respecting the direction of pull towards the victim.

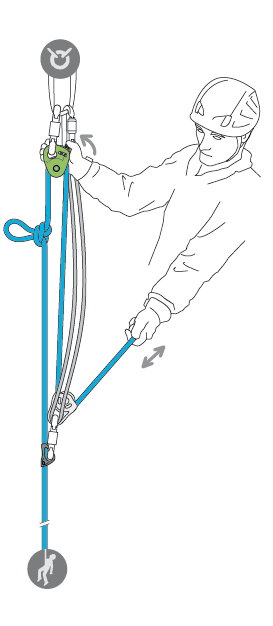
2. Install the MICRO TRAXION on the rope in the direction of hauling: it locks when pulled toward the anchor, and slides when pulled toward the victim.

3. Connect the MICRO TRAXION to the anchor sling with a symmetrical locking carabiner (ATTACHE 3D). Extend the sling to its maximum length while sliding the MICRO TRAXION on the rope toward the victim.

4. Gently release the tension of the rope on the harness to transfer the load to the MICRO TRAXION. Be careful to avoid jerky movements at this time, which would weaken the anchor.
Verify that the anchor is holding well under load. Untie the knot securing the chest loops, while remaining tied into the end of the rope.
5. The victim is now held only by the anchor; the rescuer is able to move freely.
Crevasse rescue no. 2: accessing the edge of the crevasse to evaluate the situation
Once the fall has been arrested and the victim’s weight transferred to the anchor, it is necessary to access the edge of the crevasse to assess the victim’s condition before starting the haul.
The person on the surface, the “rescuer”, must always be anchored. If creating a second anchor is not possible, the rescuer can use the same anchor as the victim. The rescuer’s movements must be done with the rope under tension to avoid a shock load in case of a fall, which could weaken the anchor.
Moving with an autoblock knot on the victim’s rope
If the “rescuer side” of the rope is too short, it is possible to move with the autoblock on the taut rope supporting the victim. The rescuer must tie-in again as soon as possible after returning to the anchor.
Warning: in this case, if the rescuer falls, for example if the crevasse lip collapses, both climbers will be held by the same rope. The stresses on the system will be significant (anchor + progress capture pulley).
– The anchor could fail, causing both climbers to fall
– If the anchor holds, the rope could be damaged or cut by the MICRO TRAXION’s cam, especially if the rope is thin (See test results at the end of this document)
Moving with an autoblock knot on the rescuer’s rope
The autoblock allows the length of the rescuer’s belay rope to be constantly adjusted, without needing to untie from the rope.

Crevasse rescue no. 3: haul systems for crevasse rescue
Many types of haul systems exist; some are more suited to various situations than others.
Here are three classic haul systems that can be done independently with minimal equipment. As with all rescue situations, training and prior knowledge of the techniques to use, are the best guarantee of success.
Simple haul system
Theoretical efficiency: 3 to 1 (victim weight divided by 3)
Advantages: minimal equipment necessary. Rapid, simple installation. Easy transition to a higher-efficiency haul system.
Disadvantages: average efficiency.
Suitable situation: victim who is capable of helping with his own ascent by using the wall.
Lightweight victim who the rescuer can easily haul.

WARNING:
For the entire duration of hauling maneuvers, the rope between the anchor and the victim must remain taut to limit the risk of shock loading. If the victim is active, for example when crossing the lip, the slack rope must be continuously taken up.
Double Mariner
Theoretical efficiency: 7 to 1 (victim weight divided by 7).
Advantages: efficient hauling with reduced equipment.
Disadvantages: complex installation, training and memorization required. Requires a 5 m cord. A lot of rope to take up.
Suitable situation: victim unable to help, edge friction, heavy victim and lightweight rescuer…
WARNING:
For the entire duration of hauling maneuvers, the rope between the anchor and the victim must remain taut to limit the risk of shock loading.
Loop haul
Theoretical efficiency: 2 to 1 (victim weight divided by 2).
Advantages: the victim participates fully in the haul effort.
Disadvantages: risk of jamming due to rope getting crossed while sending the pulley to the victim. Requires a lot of rope.
Suitable situation: rope team of two, tied-in mid-rope with the ends free and reserve rope stored in the packs. Victim capable of helping in the haul, but without support against the wall (overhanging crevasse, loss of ice axe…).
WARNING:
For the entire duration of hauling maneuvers, the rope between the anchor and the victim must remain taut to limit the risk of shock loading.
If the victim is active, for example when crossing the lip, the slack rope must be continuously taken up to limit the risk of shock loading.
Ascending the rope in self-rescue: take care when approaching the anchor
When ascending rope, it is common to climb the wall instead of the rope when approaching the anchor.
At this moment, even if it is possible to make some climbing moves, the rope must always remain taut between the anchor and the ascenders to limit the potential fall distance.
If the climber neglects taking up slack, just a single step can significantly increase the fall factor. The consequences of a slip can be severe, as arriving at the anchor is a time when the climber feels more or less “out of the woods.”
Crevasse fall: hauling on a rope with knots
Tying knots into the rope is valuable in helping to brake a fall into a crevasse when there are only two team members tied in. In case of a fall, and without a second rope available, the victim must be hauled up on a rope tied with knots, which can not pass through a rope clamp at the head of the system. The method for untying the knots requires little additional equipment.
Warnings
- Read the technical notice before viewing the following techniques.
- It is important to fully understand the information provided in the technical notice before using this complementary information
- Mastering these techniques requires training.
- Consult a professional before attempting to perform these techniques on your own.
Transferring the load to the rope clamp below
The load must be transferred temporarily onto the rope clamp below, which is connected to the anchor, in order to slacken the rope and untie the knot.
1. Once the hauling system is in place, raising the victim moves the knots toward the system.
2. Move the TIBLOC-type rope clamp below the knot to the other side of the knot. The TIBLOC is not loaded and can simply be removed.
3. With the weight still on the pulley, install a long sling (120 cm) onto the anchor and connect it to the TIBLOC. Push the TIBLOC downward until the sling is at maximum tension.

4. Carry out a small pull on the system to briefly release the cam of the MICRO TRAXION. Allow the load to descend under tension onto the sling and TIBLOC.
5. With the load on the TIBLOC, only the sling and the lower rope are taut. Untie the knot.

6. After untying the knot, check that the MICRO TRAXION’s cam is engaged and continue normal hauling on the system. After the first movement, disconnect the sling from the TIBLOC, until the next knot.

